Tutorial – Searching for and Acquiring the Components in Altium Designer
Accessing the Components
The real-world component that gets mounted on the board is represented as a schematic symbol during design capture, and as a PCB footprint for board design.
Components for your PCB design project can be created in and placed from your company’s Workspace library. These components are placed through the Components panel that uses Altium Designer’s advanced component search engine.
A new Workspace library component is created using the Component Editor where you can define all component data (domain models, parameters, part choices, etc.) manually, or use data saved from the Manufacturer Part Search panel. This panel gives you instant and up-to-date access to a powerful component search and aggregation system, detailing millions of components from thousands of manufacturers, each with real-time supply chain information. Many of the components are design-ready, complete with a symbol and a footprint model; these parts will include the ![]() icon in the panel.
icon in the panel.
Searching for New Parts
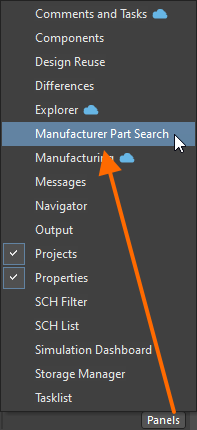
Your go-to location to find new components is the Manufacturer Part Search panel. To open the Manufacturer Part Search panel, click the ![]() button at the bottom right of the application window and select Manufacturer Part Search from the menu. Panels that are currently visible are marked with a check in the menu.
button at the bottom right of the application window and select Manufacturer Part Search from the menu. Panels that are currently visible are marked with a check in the menu.
The first time the Manufacturer Part Search panel is opened, it will display a list of component categories as shown below.

The Manufacturer Part Search panel, before performing a search.
Utilizing Altium Designer’s advanced component search engine, the Manufacturer Part Search panel can be used in a straightforward search mode by entering a query in the main Search field, or in its advanced faceted mode by progressively refining the search criteria using the Categories and Filters choices – or by using both capabilities together.
- To perform a straightforward search, type a search description into the Search field at the top of the panel and press Enter.For example:
LED green clear 0603 SMD
Use the Search field to perform a text-based search. Click the small x next to the search string to clear it, click the search string to reload it into the Search field
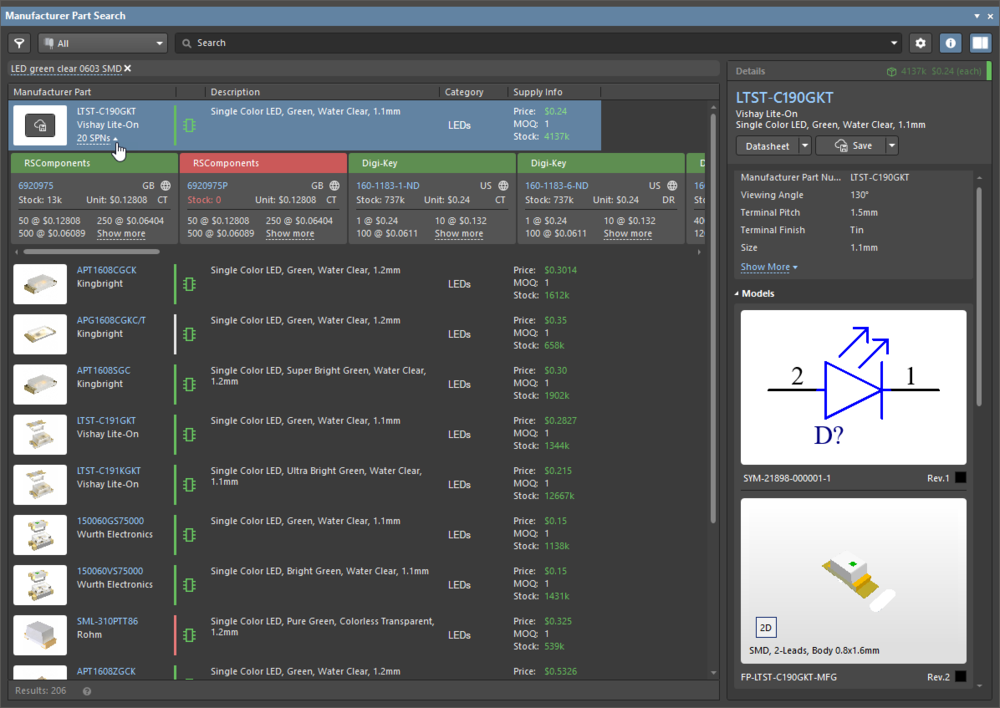
for editing, click a component description in the results list for details on that component and to access the list of Supplier Part Numbers (SPNs), as shown above. - To perform a faceted search, use the Categories and Filters to explore potential parts by toggling criteria on and off.For example:
- First select a Category, such as
LEDs, - then Filter the LEDs category by the
Color,Packaging,Mount,Has Model, and so on.

Or use a combination of the Categories, Filters, and the Search field to perform a faceted search. - First select a Category, such as


Exploring the Search Results
The search results region of the panel displays a list of manufacturer parts that wholly or partly match the search criteria. Click on a part to select it and display a link giving access to up-to-date supply chain information about that part.

Understanding the Supplier Tile
There is a large amount of information presented in each SPN tile. Hover the cursor over an icon or detail to display a tooltip with more information.

The SPN tile includes detailed information about the part and its availability.
Saving from the Manufacturer Part Search Panel to the Workspace
If a component that you have found in the Manufacturer Part Search panel has Altium design models, it will display the ![]() icon. If a component has models, the schematic symbol and footprint models will be listed in the Component Details pane of the panel (click the
icon. If a component has models, the schematic symbol and footprint models will be listed in the Component Details pane of the panel (click the ![]() button in the panel to display this pane, or click the
button in the panel to display this pane, or click the ![]() button at the bottom of the panel if the panel is in its compact mode). Any component can be saved to your connected Workspace.
button at the bottom of the panel if the panel is in its compact mode). Any component can be saved to your connected Workspace.

Use the faceted search features in the Manufacturer Part Search panel to only display components with models.
To save a component from the panel to your connected Workspace:
- Select the Save to My Workspace command:
- Click the
 button in the Component Details pane.
 - Select Save to My Workspace from the menu of the button in the Component Details pane.

- Right-click on the component entry and select Save to My Workspace from the context menu.
- Click the
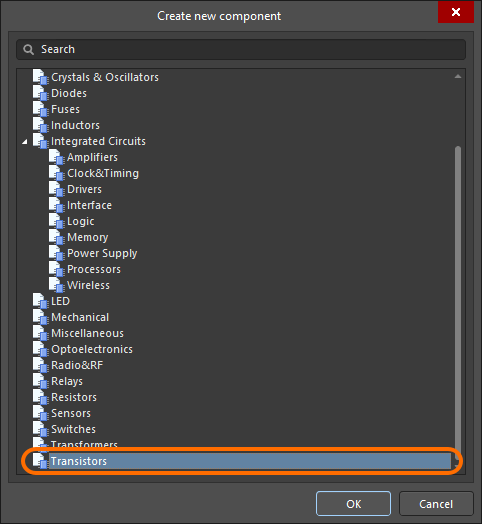
- The Create new component dialog will open. Select a component type from those that are currently defined in your connected Workspace and click OK.
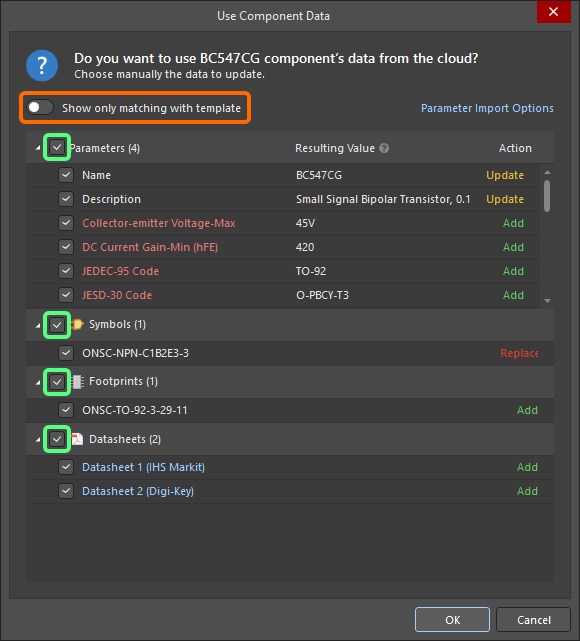
- The Single Component Editor and the Use Component Data dialog will open. Select component data (parameters, models, datasheets) you would like to add to the new component and click OK.
- Apply changes to the new component definition as required.
- Save the new component to the connected Workspace using the File » Save to Server command from the main menus.
- In the Edit Revision for Item dialog that opens, type in a meaningful comment to the component revision release into the Release Notes field and click OK.

The saved component will then be available for placement from your connected Workspace to the design through the Components panel.
————————————————————————————————————————————————————————————————————————————————————————-
Saving the Multivibrator Parts
Now, it is time to use the Manufacturer Part Search panel to find the components needed for the Multivibrator circuit as listed in the following table.
- Open the Manufacturer Part Search panel if not already – click the
 button at the bottom right of the application window and select Manufacturer Part Search from the menu.
 - Use panel’s Search field to search for:
transistor BC547.
- Click the
ON Semiconductor BC547CGtransistor to select it in the results grid in the panel. - To explore the availability of a component, select it in the results grid in the panel then click the SPN link that appears.

- Display the Component Details pane of the panel using the
 button (or using the
  button at the bottom of the panel if the panel is in its compact mode) so that you can explore the properties and models of the selected component. You will be choosing a component that includes a symbol and footprint.
 - When the required transistor is selected in the panel, click the button in the top region of the Component Details pane.
- In the Create new component dialog that opens, select the Transistors component type and click OK.
- In the Use Component Data dialog that opens, disable the Show only matching with template option at the top-left of the dialog and enable Parameters, Symbols, Footprints and Datasheets options, then click OK.

- The Single Component Editor will open, with the chosen data loaded. If necessary, you can check that the symbol, footprint, and parameters comply with your company requirements; as well as layout-critical data, such as the pin assignments on the PCB footprint. Note that most components available from the Manufacturer Part Search panel include a datasheet, available either as a PDF detailed in the list of Parameters (as shown below) or via the Datasheet button in the Part Choices list.

- When you are satisfied that the models and parameters are correct, select the File » Save to Server command from the main menus.
- In the Edit Revision for Item dialog that opens, type in a meaningful comment to the component revision release into the Release Notes field (e.g.,
Initial release of the transistor component saved from Manufacturer Part Search), then click OK. A status dialog will open while the component is saved to the Workspace. When this is complete, the Component Editor will close.
- Return to the Manufacturer Part Search panel and use the panel’s Search field to search for:
capacitor 22nF 16V 0603. - Select the
KEMET C0603C223J4RACTUcapacitor in the search result grid and click the button in the Component Details pane. - In the Create new component dialog that opens, select the Capacitors component type and click OK.
- In the Use Component Data dialog that opens, disable the Show only matching with template option at the top-left of the dialog and enable Parameters, Symbols, Footprints and Datasheets options, then click OK.
- The Single Component Editor will open, with the chosen data loaded. In the Name field in the Component region at the top-left of the editor, change the component name to
Capacitor 22nF +/-5% 16V 0603.
- Leave other data values at their defaults and select the File » Save to Server command from the main menus.
- In the Edit Revision for Item dialog that opens, type in a meaningful comment to the component revision release into the Release Notes field (e.g.,
Initial release of the capacitor component saved from Manufacturer Part Search), then click OK. A status dialog will open while the component is saved to the Workspace. When this is complete, the Component Editor will close.
- Return to the Manufacturer Part Search panel, search for:
resistor 100K 5% 0805. - Select the
Panasonic ERJ-6GEYJ104Vresistor in the search result grid and click the button in the Component Details pane. - In the Create new component dialog that opens, select the Resistors component type and click OK.
- In the Use Component Data dialog that opens, disable the Show only matching with template option at the top-left of the dialog and enable Parameters, Symbols, Footprints and Datasheets options, then click OK.
- The Single Component Editor will open, with the chosen data loaded. In the Name field in the Component region at the top-left of the editor, change the component name to
Resistor 100K +/-5% 0805 125 mW. - Leave other data values at their defaults and select the File » Save to Server command from the main menus.
- In the Edit Revision for Item dialog that opens, type in a meaningful comment to the component revision release into the Release Notes field (e.g.,
Initial release of the resistor component saved from Manufacturer Part Search), then click OK. A status dialog will open while the component is saved to the Workspace. When this is complete, the Component Editor will close. - Return to the Manufacturer Part Search panel, search for:
resistor 1K 5% 0805. - Select the
Panasonic ERJ-P06J102Vresistor in the search result grid and click the button in the Component Details pane. - In the Create new component dialog that opens, select the Resistors component type and click OK.
- In the Use Component Data dialog that opens, disable the Show only matching with template option at the top-left of the dialog and enable Parameters, Symbols, Footprints and Datasheets options, then click OK.
- The Single Component Editor will open, with the chosen data loaded. In the Name field in the Component region at the top-left of the editor, change the component name to
Resistor 1K +/-5% 0805 500 mW. - Leave other data values at their defaults and select the File » Save to Server command from the main menus.
- In the Edit Revision for Item dialog that opens, type in a meaningful comment to the component revision release into the Release Notes field (e.g.,
Initial release of the resistor component saved from Manufacturer Part Search), then click OK. A status dialog will open while the component is saved to the Workspace. When this is complete, the Component Editor will close.
- The last component to find is the 2-pin header. Return to the Manufacturer Part Search panel. This time you will use the panel’s faceted searching capabilities.
- In the Categories drop-down, select Headers and Wire Housings under the All » Connectors category.
- Click the Filters button (
 ) to display the Filters pane.
 - The list of available filters is dynamically updated to suit the category being used and can be quite long. To help manage it, only the most commonly-used filters are displayed. Scroll to the bottom of the list and click the
 link to display all of the available filters.
 - An efficient way of working with the filters is to use the Search field at the top of the Filters pane. Searching returns strings that match in either the Filter Name or in the Filter Settings. Using the following search terms, apply the filters and select the options listed below:
SEARCH FOR CHOOSE has modelHas Model: YescontactsNumber of Contacts: 2pitchTerminal Pitch: 2.54mmmaleContact Gender: MalestraightMounting Style: STRAIGHT - A small number of 2-pin vertical male headers should be returned, as shown below. Select a suitable 2-pin vertical male connector with a pin pitch of 2.54mm (0.1in) from the search results, such as one of the
Samtec TSW-102-?series of headers, and click the button in the Component Details pane. - In the Create new component dialog that opens, select the Connectors component type and click OK.
- In the Use Component Data dialog that opens, disable the Show only matching with template option at the top-left of the dialog and enable Parameters, Symbols, Footprints and Datasheets options, then click OK.
- The Single Component Editor will open, with the chosen data loaded. Leave the data values at their defaults and select the File » Save to Server command from the main menus.
- In the Edit Revision for Item dialog that opens, type in a meaningful comment to the component revision release into the Release Notes field (e.g.,
Initial release of the connector component saved from Manufacturer Part Search), then click OK. A status dialog will open while the component is saved to the Workspace. When this is complete, the Component Editor will close.
Nguồn: https://www.altium.com/documentation/altium-designer/tutorial-searching-acquiring-components